

There’s no place like home for the holidays! This is the time for family and close friends to gather and bond with each other through Christmas activities, games, and traditions. In this list, you will find some festive holiday inspiration and holiday DIY crafts that’ll spread cheer throughout your home. These activities are perfect for independent projects, or for family crafting nights with your little ones. Whether you are creating holiday decorations for your home, making gifts for your loved ones, or creating memories with your family members, these Christmas crafting projects are sure to get you into the holiday spirit!
Queue up with your favorite Christmas movies or music, heat up some cocoa, and let the crafting begin! Below we have outlined 16 unique Christmas crafts perfect for kids and adults, to do together or individually.
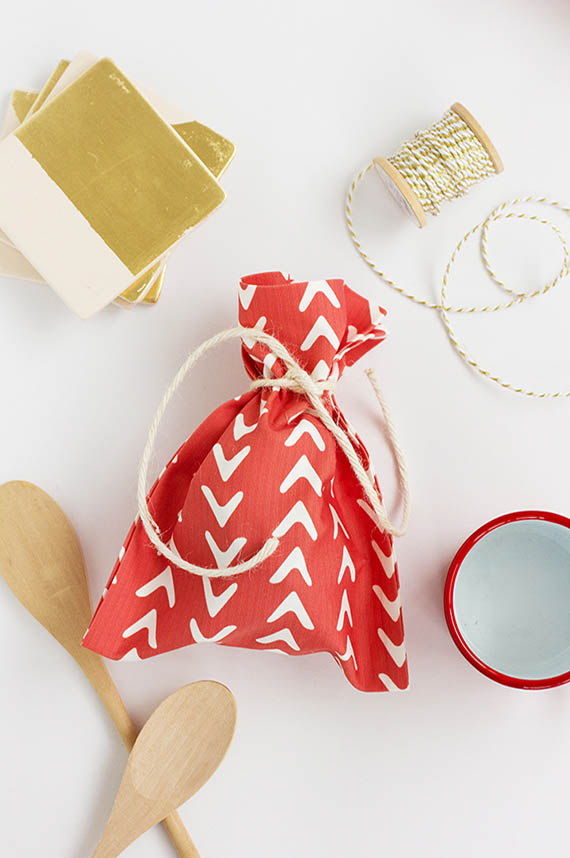
This is a great creative project that provides a unique alternative to wrapping paper. These do-it-yourself holiday gift bags are so easy to make. No need to hassle with any needles or thread! These cloth gift bags are a great way to wrap oddly shaped gifts and to sprinkle a little flair into traditional gift giving.
Best for: Adults and supervised kids
Items Needed: Fabric, fusible hemming tape, ribbon or twine, an iron, ironing board, fabric scissors.
Directions: First, cut out the shape of your bag. We recommend starting with an 18 x 16 piece of fabric. Flip your fabric to the “wrong” side (pattern/color side down), and fold in three of the edges, pressing each fold with your iron to create a defined fold. Leave one side of the fabric unfolded. Measure out fusible seam tape to run the same length of the folded ends. Place the tape between the folds, then iron. Flip your bag inside out and fill it with your holiday goodies, then top it all off with a bow. For a fun visual guide, visit our step by step instructions for this family-friendly craft. These simple gift wraps will add a special, one-of-a-kind touch to your holiday gift-giving. Add more unique touches with custom gift tags and ribbon.
See our other alternative gift wrap ideas if you’re looking for sustainable and eco-friendly wrapping paper alternatives!
The countdown to Christmas is always magical, no matter how old you are. An advent calendar is a great way to keep track of the days during the holidays. These unique calendars using matchboxes as the vessel to open each day allow you to enclose fun candy or tiny gifts of your choosing. This homemade project elevates the traditional advent calendar and can create a modern statement for your Christmas mantle.
What you need: Printable San Francisco Advent Calendar or Printable New York City Advent Calendar, 24 matchboxes, glue and small treats (hard candies, small toys).
Directions: Download and print out Minted’s San Francisco or New York City advent calendar template, then empty your 24 matchboxes. Cut out all the images displayed on the template and glue them to the cover of the individual matchboxes. Fill each matchbox with a treat; small hard candies, tiny party favors, or stickers make great advent calendar surprises that will bring delight every day. Lastly, glue the matchboxes to poster board to create a mountable calendar. This easy-to-make advent calendar is a fun Christmas craft that will bring a smile on each day of December!
Transform everyday clothespins into unique ornaments for your Christmas tree, garlands, or wreaths. These are easy to create and clip onto your existing holiday décor. This easy Christmas craft could be done using clothespins or popsicle sticks. Use your imagination to create other characters like reindeers, Santa, or make miniature clothespin representations of your family! These kid-friendly materials make these clothespin characters a great way to entertain kids with a safe craft during cozy December days indoors.
What you need: Natural wood clothespins, yarn in colors of your choice, glue, mini pom poms (variety of colors), paints, paintbrush, black marker, and scissors.
Directions: Start by painting the clothespins with white paint. You may need to do more than one coat, but make an effort to open the clothespin a few times while it dries to make sure it does not stick together. Once the paint dries, take a short piece of yarn and wrap it around the clothespin, making a knot. Add some glue to secure it! Now use the black marker to draw two eyes, mouth, and buttons on the body. Add a drop of glue between the mouth and eyes and stick on the orange pom pom for a nose. Let your imagination run wild and create other winter characters like penguins, reindeer, and holly! Add your clips to your tree, garlands, or use them around the house to hold Christmas cards you receive in the mail.
Transform your everyday drinking glasses into festive Christmas dinner accessories. This DIY Christmas craft for adults uses a Cricut cutting machine to create gorgeous, easy-to-make decals for your drinking glasses. Although this craft requires adult supervision, children can decorate their own cups and lunch containers after the decals are printed.
What you need: Paper cutting machine like Cricut Explore, metallic adhesive foil, clear glasses, and downloadable holly template.
Directions: This peel-and-stick craft is a simple way to upgrade your glassware for the holidays. Start by downloading the holly template and arrange multiple hollie patterns in your cutting tool. A variety of holly sizes will yield a more interesting look compared to uniform decals. Add the gold adhesive foil to your cutting mat and begin cutting the holly template. Once all cuts have been made, remove the excess gold foil matting, leaving only the holly stickers. Pull the holy shapes from the map and adhere them to the drinking glasses. Asymmetrical placement and a variety of sizes will make for elegant and unique glasses.
Keep your kids busy with this easy DIY Christmas craft that requires little more than green construction paper and scissors. The cute decorative Christmas trees can be placed around the home and are the perfect size to feature on your Christmas mantel. You could even prop up a few holiday cards in the paper grooves as a unique holiday card display idea.
What you need: Colored paper (preferably green), pen, ruler, scissors, glue stick, and our downloadable tree template.
Directions: Print out our tree template on thick paper and cut out the perimeter tree outline. Slide your green paper overtop the template and begin tracing the appropriate perimeter lines and dotted fold lines. Once all lines have been traced, cut the green paper down to the large almost-triangular shape. Fold the green paper accordion-style along the dotted lines until all folds have been made. Using your glue stick, glue the final end flaps together.
These cute and simple candy cane ornaments are the perfect DIY Christmas craft for the entire family. Traditional colors like red, green, and white make for classic Christmas tree decorations, while metallic silver, white, and gold create a sophisticated holiday feel. You can also go wild and let your kids, or inner child, choose their own rainbow colors! This very simple craft tutorial will allow you to make the perfect ornaments for your home. You can even attach your candy canes to your wreaths, garland, or other Christmas flower arrangements for a unique touch.
What you need: White or red pipe cleaners, glue, scissors, and beads (your choice of colors).
Directions: This candy cane ornament tutorial will help you create easy to make ornaments. Cut the pipe cleaner to the length that you want, but remember you will need to bend the top to form the candy cane shape. Now, slide the beads onto the pipe cleaner switching off between red and white. Once you fill up the pipe cleaner with beads, add a dot of glue to both ends to hold the beads in place. Once dry, bend the pipe cleaner ¾ of the way from the top to make a candy cane shape. You can either hook the candy cane by the hook shape at the top, or add an ornament hanger to complete the craft. These can be used for years to come, or given as keepsakes to family members.
This gorgeous metallic laurel wreath adds a stunning touch to your holiday home decor. Turn a traditional Christmas wreath into a statement by adding a touch of shine to elevate your door or mantel. This Christmas craft requires a handful of supplies, including real leaves. Bundle up and take a walk with the family to collect the perfect leaves for your wreath. This DIY laurel tutorial will give you the steps to create a beautiful statement piece for the holidays.
What you need: Foraged leaves, florist wire, wire cutters, gold spray paint, and fishing line.
Directions: On a covered surface and in a well-ventilated area, spray paint one side of your leaves and let them dry completely. Repeat the step on the other side of the leaves and allow them to dry again. Trim the florist wire to a length of 50" (which will create a 16” diameter final product. Fold the length of the wire back on itself so you have two strands of wire side-by-side measuring 25”. Twist one end of the wire to form a small loop. Working your way down the wire, starting at the loop, begin to attach gold leaves using your fishing line. Attach more and more leaves to the wire, making sure there are no blank areas. Once the leaves run the full length of the wire, you can gently bend the wire into a crescent moon shape.
Celebrate classic Christmas ornaments by creating your own hand-painted Christmas decor. Transform clear or solid-colored baubles into personalized vintage-inspired ornaments with our helpful tutorial. This family-friendly craft may require some adult supervision, but kids can choose their favorite colors to pair up and decide on where to apply colors. These pastel brights will make your tree stand out in all your holiday family photos. You can repurpose old ornaments or purchase clear or solid ones to use as a base for your paints.
What you need: Ornaments, gloves, spray paint (if using clear ornaments), acrylic craft paint, spray bottle, water, paint brush (optional), styrofoam block (optional), and pins (optional).
Directions: Before starting the project, make a drying rack by putting metal pins or nails about and inch apart from each other into a styrofoam block. Set your ornament on the pins and completely cover it with a base color of spray paint. Be sure to do this in a well-ventilated area (preferably outdoors) and follow all safety instructions. Let your base coat dry completely. Next dilute your acrylic paint with water and pour this mixture into your spray bottle. Be careful not to add too much water to the paint, as you want the paint to still hold its color. Spray your acrylic paint mixture onto your ornament to create a unique blasting/dripping effect. Return your ornament back to the drying block or hang it from something so it can completely dry. When your DIY ornaments are complete, add a ribbon or hook to the top and put them on your tree.
This DIY holiday garland is a fun Christmas craft idea you can work on while watching your favorite holiday movies. For the less crafty folks, Minted also sells beautiful felt garlands made by artisans in Nepal that come in traditional red, white, and green Christmas colors that are perfect for the holidays, or in neutrals that can help you transition into the New Year.
What you need: Felt garland, red felt balls, green felt sheets, stapler and staples, scissors, markers, hot glue gun and glue sticks, and our leaf template.
Directions: This DIY Christmas craft assumes you already have a simple felt ball garland (either store bought or homemade). Start by printing out our leaf template and tracing the pattern onto your sheets of green felt. Cut out your holly leaves, pinch the base end of the leaf, then staple together to get a folded look. Next, glue two or three red felt balls together to create berries. Glue the leaves together, then glue the berries to cover the base of the leaves to create a beautiful holly arrangement. Repeat these simple steps to create as many holly bunches as you wish. Take your finished holly bundles and glue them along your garland strand.
Nothing says the holidays like Christmas cards mailed from friends and family! Cards are usually displayed on the fridge or hung on a garland across the fireplace, but this craft will help you create a more unique display! This Christmas craft tutorial will give you step-by-step instructions on how to create little Christmas tree-shaped card holders out of polymer clay. This is a great at-home craft idea perfect for the entire family.
What you need: Polymer clay, hot glue gun, baking sheet, parchment paper, smooth-sided drinking glass, tin foil, and a knife.
Directions: Cut your colorful polymer clay into little one-inch cubes. Using your drinking glass, roll the clay into a flat sheet around a ½ inch thick. Take your knife and cut a triangle from the clay (resembling the shape of a Christmas tree). Be sure to also cut a little square piece from the clay which will later help your Christmas tree stand on its own. Carefully cut a ¾ inch slit down the middle of the tree (this slit will eventually hold your Christmas cards). Slide a piece of tin foil in this slit and arrange your clay triangles and squares on a parchment-lined baking tray. Bake your clay for as long as recommended on the packaging. Lastly, once your clay has cooled, glue the square piece to the base of your Christmas tree triangles so they can stand on their own.
Christmas lights are a sure-fire way to brighten the holidays. This at-home holiday craft is kid and adult-friendly and will have you creating your own string of themed lights in no time!
What you need: String of Christmas lights, scrap paper (patterns and different finishes recommended), geometric die-cut paper or doily paper, scissors, and glue.
Directions: These paper light covers will go around each small bulb to create a warm, colorful glow, and the die-cut paper will allow light to shine through. Start by cutting out two identical shapes (could be a heart, Christmas tree, star, etc.) from both your scrap paper and die-cut paper. Die-cut paper can be purchased at most craft stores and features a certain pattern of holes cut into the paper. Take your scrap paper cutout and place it behind an individual light of your Christmas lights. Glue your die-cut shape overtop the craft paper shape, sealing the light between the two pieces of paper. Be careful to only glue the perimeter of the paper and avoid gluing the center of the cutouts, where the light will be giving off heat. Continue this process until all lights on your strand are covered.
This craft idea is perfect for kids of any age, but may need some assistance from adults on tracing and cutting out the handprint. It is super easy, and should take only a few minutes! This versatile craft can be used as an ornament, a card for a loved one, or even place settings on your table.
What you need: Brown cardstock, thin red ribbon, small red pom-poms, small jingle bells, small googly eyes, brown pipe cleaner, scissors, and glue.
Directions: Trace your child's hand, spread out, on the brown cardstock with a pencil, and then cut it out with scissors. Cut out a small circle to act as the head, and glue it onto the thumb area. Cut four small pieces of the brown pipe cleaner, two slightly smaller than the others. Twist the smaller piece onto the longer piece to form your antler, and glue to the back of your reindeer’s head. Repeat this step with the other two pieces of pipe cleaner for the second antler. Use glue to add your googly eyes and pom-pom for the nose. Using your red ribbon, thread three jingle bells through it and wrap it around the body of the reindeer above the fingers (legs). If you want to make this into an ornament, cut another piece of ribbon, form a loop, and glue the ends to the back of the reindeer.
These beautiful white and red ornaments are in the style of traditional Scandinavian home decor. They are festive and pair well with other red and gold decor. The red ribbon and bright, matte white finish give these ornaments a timeless modern look. This at-home Christmas craft is the perfect way to gather your family together in the kitchen to create memories and decor that will look great for years to come.
What you need: Air dry clay, festive cookie cutters (simple holiday shapes such as stockings, dove, or stars), rolling pin, pin or toothpick, scissors, ribbon or twine, and quick dry glue.
Directions: This simple craft is perfect for kids and adults! Start by rolling out your clay, then use your cookie cutters to cut out fun holiday shapes. Don’t worry if you make a mistake; just roll out the clay and try again! After you’ve created your desired shape, use a pin or toothpick to create a small hole at the top of your ornament. This will create the space for you to attach a string for hanging. Allow your shapes to dry for 24-48 hours. When they are dried and holding their shape, cut a piece of ribbon or twine, tie it together, and glue it into the pinhole you created. Wait for the glue to dry completely, then hang your ornaments. If you can make cookies, you can make these ornaments!
Some Christmas crafts are so complex that they can take hours to make, but these pinecone Christmas trees are so easy that anyone can make them! They are great for decorations on the table, mantle, fall decorated shelves, and more. Adults may need to assist with the hot glue gun, but children will love painting on an untraditional surface. An added bonus is that the pinecones will bring a great scent to your home!
What you need: Pinecones, green spray paint, wine corks, scissors, hot glue gun, and miniature wooden stars.
Directions: Spray-paint the pinecone with the green spray paint. If you want to have it look more like a real tree, you can spray-paint the outer edges and leave the inside brown. Once the pinecone is dry, cut one of the wine corks in half and glue it to the bottom of the pinecone. Now, glue the star on top.
Create a beautiful window scene by putting together a miniature Christmas town. This at-home project will be fun for kids and kids-at-heart. Creating mini homes that are covered in snow will add a festive and cozy touch to your holiday decor. This do-it-yourself Christmas craft is a great way to transform recycled materials into unique home decor. So grab all those boxes that have arrived in the mail recently and get ready to turn them into a tiny winter wonderland!
What you need: Cardboard, fabric of your choice, Mod Podge, foam brush, scissors, craft knife, hot glue gun, and miniature brush trees and wreaths (optional).
Directions: Start by creating a template for a variety of sizes of houses. We have some suggested sizes already worked out for you. Using your templates, draw your wall and roof shapes onto the cardboard and cut them out. Coat these pieces with Mod Podge and then completely cover one side of the cardboard with a fabric of your choosing. Allow everything to dry completely before moving to the next step. Use your craft knife to cut out the doors and windows of your tiny homes. Once all your pieces are complete, glue all them in place, gluing the roof last. When your completed house has dried, it’s time to add on festive decorations. Add fake snow, miniature wreaths, or write in a house number on the front. Let your creativity shine and create a little Christmas community for your windowsill or mantel.
We saved the easiest Christmas craft for last! These DIY gift tags will add some subtle elegance to the presentation of your holiday gifts. For those unfamiliar with the term, cyanotypes are prints that are produced by using a solution or pretreated cyanotype sheets beneath objects, then exposing the project to UV light. This process leaves an imprinted duplicate of objects like leaves, flowers, and other natural objects. We have done the heavy lifting and created beautiful gift tag templates featuring cyanotype patterns you can print at home.
What you need: Scissors and a hole punch.
Directions: Print out our circular tag or rectangle tag templates with a color printer. Ideally use a thicker paper stock in the printer. Cut out the gift tags and use the hole punch to cut out the designated tag hole. String luxurious ribbon or twine through your tags and attach them to your present.

We’ve included lots of Christmas activities for families and individuals who are ready for the holidays.
We uncover design genius through ongoing design competitions. At Minted, all that matters is good design. Designers submit, and the Minted community votes to tell us what to sell.


