It’s common to wonder how some people make arranging wall decor look so easy. Fortunately, in this article, we reveal many of the tricks of the interior design trade. Recommendations pulled directly from our team of stylists will help your home decor look like it was inspired by a modern art gallery. When it comes to arranging one piece or multiple pieces of art, there are so many things to take into consideration, like display height, the pairing of symmetrical or asymmetrical patterns, and whether you should hang a painting or rest it on a ledge. Read on as we walk you through how to arrange wall art and ways to display your artwork using nails or other clever solutions.

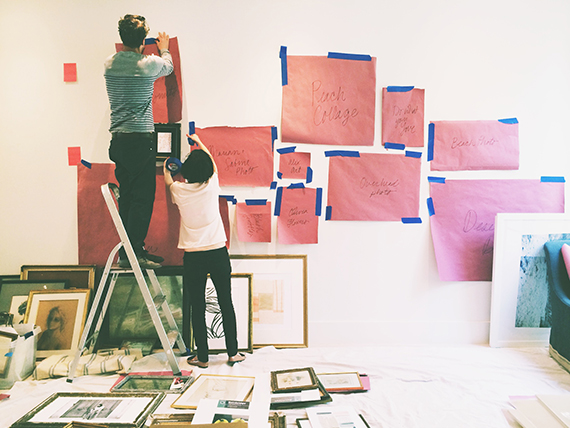
Professionals suggest playing around with wall art arrangement ideas before the hammer comes out. One way to do this is with butcher paper. Cut the paper to the actual size of your artwork and tape it to the wall to get a visual of how it will look. If you’re arranging more than one piece, it will also give you a better idea of how your entire wall will look. You can very easily move your cut-outs around and experiment with different placements, patterns, and arrangements. No need to fuss with filling in unwanted holes placed in your wall!
A similar idea from Minted’s Art Stylist Mary suggests you “lay out your design on the floor first to help you visualize the final look. This will give you the creative freedom to easily move things around until your design is just right and ready to hang.”
The size and shape of a room can have a big influence on your picture hanging arrangement ideas. We have a detailed post on how to pick art for every room of the house, but we have highlighted a few key points below:
Bedroom: Big statement pieces above the bed are a popular option, as they provide a single focal point. Depending on what type of artwork you choose, the wall hanging can also provide a calming vibe in your bedroom, which is primarily meant for rest and relaxation. An intricate arrangement of smaller art in the bedroom can cause a bit of visual chaos, but when executed well it can have a similarly calming effect.

Image source: Niki Brantmark (@myscandinavianhome)
Kitchen: Oftentimes kitchen wall space is dispersed among practical kitchen appliances. You might be looking for wall space between storage, cabinets, stove hoods, appliances, and the like. As a result, kitchen art placement should be organized after you have ergonomically arranged your kitchen. It doesn’t make sense to feature a favorite framed wall hanging in a space that is blocking an ideal spot for a knife block, dish drying station, or wine rack. Sort out the practical elements of your kitchen first, and then envision how artwork can complete the look.
Bathroom: When you’re considering how to arrange wall art in a bathroom, smaller options always work best in small rooms. Don’t fret, as sometimes less is more when decorating walls. Consider creative placement, like hanging a painting so it can be seen in the reflection of the bathroom mirror. Also, remember you’re styling a room with significant humidity, so don’t arrange artwork too close to the shower or areas where water droplets and steam could have a higher potential for damaging your art.

Image source: Jessica Brigham (@imjessicabrigham)
Living Room: Typically the living room is the largest room in the house, so consider hanging a big piece of artwork or creating a unique gallery wall arrangement above the mantel or couch. Watch how our CEO and founder, Mariam Naficy updates a gallery wall of her own.

Image source: Kamala Nahas (@photo_kamala)
Art galleries and museums hang artwork at eye level so it can be appreciated. Minted’s Art Stylist Mary even says, “Hanging art at eye level, which is about 57-60 inches from the center of your art print to the floor, is not only visually pleasing, but it is a gallery standard. While this simple trick is a good rule of thumb, it is not the only way to showcase art.”
While this isn’t an unbreakable rule, you can rarely go wrong following this guidance. There are instances where you might hang artwork higher or lower, such as in a kids’ room, or in an attempt to align with the natural contours of a room like a windowpane or a kitchen cabinet.

Image source: Anita Yokota (@anitayokota)
If you’re trying to figure out how to hang multiple pictures on a wall, there are numerous patterns or strategies you can follow. We breakdown popular wall art arrangement ideas below:
Symmetrical looks: For those who find comfort in order, oftentimes side-by-side, evenly spaced wall art arrangements will be most pleasing to the eye. Use art prints and frames that are the same size and style to create a look that is organized and beautiful. For stylish art pairs, review our post on the 7 popular ways to arrange diptychs and triptychs. Avoid pairing one landscape-oriented painting with a portrait-oriented one. Beauty and symmetry are in the details. Use a ruler to perfectly space each painting. And, if you are hanging a group of four pieces in a grid, the spacing should be even on every side.

Image source: Abigail Aguilar (@lifeasabigail_)
Asymmetrical looks: Get creative as you explore ways to display art asymmetrically. Consider stepped or clustered arrangements, different frame styles, sizes, colors, and hanging an odd number of pieces (rather than even, which more-easily falls into a pattern). You may want to showcase a larger piece as the focal point with smaller pieces alongside it featuring complementing subject matter. Take cues from art galleries on how they hang art or check out Minted’s art inspiration page featuring Minted art hung in actual homes!

No matter whether you opt for a symmetrical or asymmetrical look when arranging a collection of wall art (more than 3), think about a defined starting line that your arrangement begins at. This could be an imaginary line running parallel to your ceiling that artwork cascades down from. It could also be an imaginary vertical line bordering a windowpane that artwork uniformly builds out to the right of. Having one symmetrical non-visible line that frames your arrangement can create visual order. You will notice that both images at the top of this arrangement are aligned vertically.

When arranging multiple pieces of artwork together (or hanging 2 pictures staggered), take into account how they can best complement each other and the other elements in the room. For example, you may want to arrange artwork that ties in perfectly with colors found in your wall paint, wallpaper designs, furniture, and pillows. And while it is customary to use art to pull together a color theme for a polished look, also consider a clashing theme that may capture a bold look you are aiming to achieve in a room. Be sure to read through our post on color theory and the color wheel to understand what colors pair naturally with each other and the different moods colors can create.

Image source: Sharrah Stevens (@sharrahstevens)
Hanging wall art is the most common solution for displaying artwork in your home. Don’t forget that there are alternative options too! Some arrangement opportunities could call for resting artwork on creative surfaces throughout the rooms of your house. Surfaces like a countertop or mantel add a fun touch and element of discovery for guests. You can also install stylish art shelves. Using art shelves allows you to include other items next to your art, such as plants, meaningful trinkets, or other three dimensional elements.

Image source: Rust & Trust by Thomas Trust (@rustandtrust)
You might find yourself asking, how many paintings should be in a room? Unfortunately, there is no universally accepted answer. As you assess the blank wall space you wish to decorate, decide how much of it would look aesthetically pleasing covered. Use the butcher paper technique discussed above to see what arrangements you like the most. For those unfamiliar with the term, a “gallery wall” is a collection of art, photographs, and other decor that can be arranged to fill an entire wall.

Image source: Nathalie Martin (@_nathaliemartin)
As they say, “Two heads are better than one.” Seek out a trusted friend for a second opinion on your wall styling vision. Our styling team is happy to help as well! Simply text us a picture of your wall, answer a brief survey, and get feedback from one of our professional stylists on the fine art selection that makes the most sense for your space - for free! We have helped thousands of customers over the years figure out how to arrange wall art for every room in their house.

Image source: Kate Arends (@witanddelight_)
Once you’ve selected the artwork you want to hang, it’s time to complete your decor renovation DIY project. Rather than using simple nails, we recommend you purchase picture hanging hooks, which come with nails, at your local hardware store. Then, follow these easy steps to hang your art:

Image source: girlonthehudson (@girlonthehudson)
Does every wall need a picture hung from it? Not at all! If you’re looking to avoid using nails or want a creative solution for hanging a painting on a harder surface (like brick or cement), we have some great alternative ideas. Consider using adhesive hooks. Your local hardware store should sell options in various materials and sizes. Other options include placing artwork on bookshelves, mantels, easels, and end tables. You can also consider the minimalist look of propping portrait-oriented art up against a wall on a countertop or the floor. This modern look is great for an urban loft.

Image source: Chelsie Lopez Production (@chelsielopezproduction)
How to understand different mediums and techniques used to create wall art. Read more.

What you need to know about color when selecting artwork for your home. Read more.

Styling your home with unique wall decor is often easier said than done. Read more.
We uncover design genius through ongoing design competitions. At Minted, all that matters is good design. Designers submit, and the Minted community votes to tell us what to sell.